IBM i Projekt Beispiel

Im GitHub habe ich ein Beispiel-Projekt zur Demonstration des DevOps kozepts:
IBM i Build Projekt
Overview
My DevOps concept includes multiple components like GIT as a basis for source management.
In this example I focus on the build part of the DevOps concept.
For all IBM i builds I use 2 components:
-
GNU Make
Build you source
- In correct order
- Consider dependencies (PF/LF/DSPF –> RPG)
-
VSCode or RDi with RSYNC
To synchronise your sources to the build server (IBM i)
Quick Start
Prerequesits
- To be able to compile the source on IBM i
- GNU Make is installed
- To be able to work with your local IDE
- SSH is working well
- Windows
- Windows Subsystem for Linus (WSL) is installed
- Linux
rsyncis installed
- VSCode extensions if you use vscode
- RDi is installed
Without IDE
If you only want to compile on your machine without any IDE:
Proceed the Summary
With VSCode as IDE
- Rename the
settings.jsonfrom the Windows or Linux template - Adapt the makefiles to your environment
- source location
- target lib
- LIBLIST
- ACTGRP
- etc.
- Just run the build
SSH
Sicne we use the SSH protocoll to communicate with IBM i we need:
-
SSH Deamon is up and running
STRTCPSVR *SSHD -
The open source package manager (YUM) is installed on IBM i
You can do this in ACS
-
Recommended: BASH is installed and set to your profile
In shell:
yum install bashSQL:
CALL QSYS2.SET_PASE_SHELL_INFO('*CURRENT', '/QOpenSys/pkgs/bin/bash'); -
Define
~/.profilefile:export PATH="/QOpenSys/pkgs/bin:$PATH"This is neseccary to have the correct
PATHin the IBM i shell. -
Use key authentication
ssh-keygen -b 4096 # Enter your key name full qualified (e.g. /home/prouza/.ssh/academy_rsa) # Then you will be asked for a password. If you set one, you will be asked for it on each Login. If not you will be logged in without any prompt.-
Linux
On Linux you can simple use
ssh-copy-idto copy the public key to your remote system.ssh-copy-id -i ~/.ssh/academy_rsa prouza@academy -
Windows
Copy the content of the generated public key (e.g.
academy_rsa.pub) on the remote system to the file~/.ssh/authorized_keys. (You also need to create the directory if not exist.)
Be aware that the directory.sshand the fileauthorized_keysare not allowed to be readable by anyone except of you.chmod 600 .ssh/authorized_keys
On your local machine create the
~/.ssh/configfile (and directory) if not exist and add the following:Host academy HostName academy IdentitiesOnly=yes User prouza IdentityFile ~/.ssh/academy_rsaNow you should be able to login without a prompt:
[andreas@Andreas-Linux ~]$ ssh academy -bash-5.1$- Most problems here are
- Home directory does not exist
- Home directory does not match with user profile name
- Owner of home directory is someone else
- Permission of the home directory is not strict enough
-
GNU Make
Installation
You can install ist via ACS OpenSource-Package-Mangager or via YUM in the console
yum install git

===================================================================
 Package        Arch          Version       Repository        Size
===================================================================
Installing:
 make-gnu       ppc64         4.2-2         ibmi-base        520 k
Set up our Makefile(s)
gmake uses makefiles in which the plan is set up how to build your application.
For more details about makefiles you can find a lot of stuff in the internet.
I split it up into 5 makefiles
-
makefile
The basic config file to start the build (source location in IFS, target lib)
-
env.mk
This I use to define search paths and environment variables
-
.makeprofile.mk
This file shouldn’t be synchronised to the GIT project since this is individually for each user.
If you are using GIT (and you should), this files is in the.gitignorelist.
Here you can overwrite for example the source directory to you own working directory in the IFS.If you are not using GIT and you only have one directory where all developers are working with, you can just delete the
.makeprofile.mkfile. -
objecte_list.mk
A list of all objects and their dependencies.
First all objects are stored in a variable with a blank as separator.Then all objects with dependencies are listed including all dependiencies which
makeshould consider.
You can find a detailed description in this file. -
make_compile_rules.mk
For all type of objects you want to create the build command needs to be defined here (RPG, CL, DSPF, SQL Tables, …)
I already set up the compile rules, so it should be able to handle most of your (ILE) builds.
If you also want to build objects like menues or printer files, you can simple add the command at the end of this file.
Run GNU Make
Build directories
This Makefiles uses 2 directories in the IFS for the build output
-
build
For each compiled/created object a dummy file will be created in the
build.
The creation timestamp of these files will be used to compare it with the last changed timestamp of the source of the object.
If the source is yunger then the compile process of the object will be started.
Otherwise it will be ignored. -
logs
Contains compile output: spooled files and job log
Preperation
Since the gmake all checks if a source has been changed since last build, gmake would compile all sources on very first run.
If you don’t want to build all from scretch and only wants to build new changed sources from now, you can use the following:
gmake init # to create all necessary directories for build
gmake all --touch --directory=build --makefile=/home/prouza/myproject/makefile
This only creates the dummy build object files in the build directory.
Run build
After all this is done you can use gmake to build all changes in your application.
gmake all
Summary
-
Install GNU Make on IBM i
-
Create a project directory in you working IFS path (e.g. /home/prouza/myproject)
-
Copy all sources into this directory.
All source files are subdirectories (e.g. /home/prouza/myproject/qrpglesrc/logtest.rpgle) -
Copy all make-config-files
-
Modify the makefiles to your own settings
- makefile
- IFS Path
- Target lib (PGM & DB)
- ACTGRP
- LIBLIST
- object_list.mk
- If you want to add additional objects to be build
- .makeprofile.mk
- If you want to override some settings for your own environment
- makefile
-
Open a terminal (QSH, Putty, …)
-
Make sure you have the
$PATHvariable set correct (/QOpenSys/pkgs/binneeds to be in the list)
I also useBASHas shell. It makes life much easier. -
Go into your directory
cd /home/prouza/myproject -
Run the build
gmake all
Integration in your IDE
VSCode
You should have installed the Code for IBM i extension.
With this you can work with your sources directly in the IFS of your IBM i.
If you use GIT I recommend to install the Git Graph extension.
VSCode & RSYNC
After our project was set up successfully we can now focus on our favourite IDE.
In both IDEs you can use external commands like rsync to automatically synchronise your code with your working directory in the IFS.
You can set up in both IDEs (RDi and VSCode) to do this automatically after saving your changes in the source.
Prerequisites
You need to install rsync on your local machine and on IBM i.
IBM i
yum install rsync
Linux
On Linux this is very easy. It only depends which package manager you are using:
yum install rsync
apt-get install rsync
pacman -S rsync
Rename the settings.json - for linux to settings.json to get the Linux settings.
Windows
rsync is a Unix based utility. So you can’t just easily install it on Windows.
I did this job by using WSL (Windows Subsystem for Linux).
-
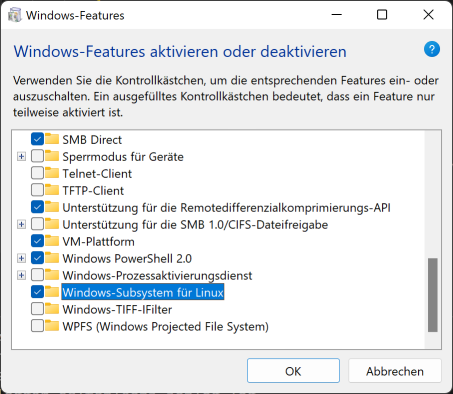
Open the “Turn Windows features on or off”
-
Choose “Windows Subsystem for Linux” and select “OK”
-
Open the Microsoft Store and search for “Linux Ubuntu” and install it
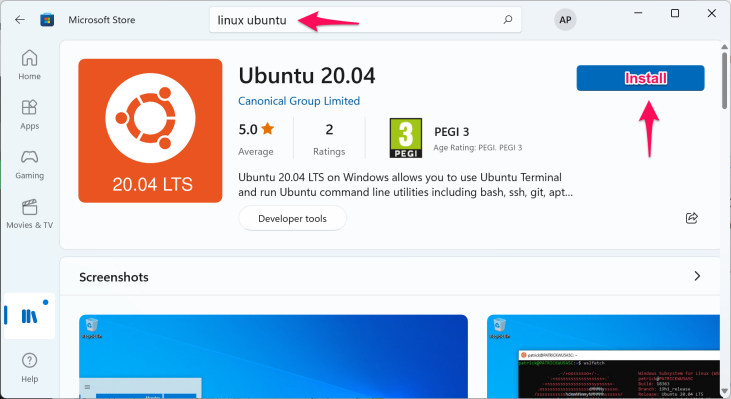
-
After installing the Linux distribution “Launch” it.
The first time you may will be asked to set up a user/password for this environment.
You can also do this via PowerShell. You will find a good documentation in the internet for this process if you want to do it in that way.
After this is done you can use rsync using WSL in the Windows CMD:
wsl rsync ...
Rename the settings.json - for windows to settings.json to get the Windows settings.
VSCode extensions
Therefore I am using 2 extensions:
-
Run on Save
Automatically sync when source is saved.
So no need to do some extra sync. -
Command Runner
To trigger the sync manually (e.g. if I switch branch) using:
STRG+P –> Select: Run Command –> Select: Run Build (summary output)
You can just use the .vscode/settings.json from this project.
Don’t forget to change hostname and user.
Let’s run the build
Use STRG+P. When you start typing “run command” you should get correct list to select the “Run Command” extension.

Now you will get a list of commands, which are defined in the .vscode/settings.json.

Now the command will be issued:
- Sync sources to the IBM i
- Run build
- Sync back the logs
You may get asked for your password.
I use key authentication, so I will get signed in automatically.
(This is btw the most secure way to connect to servers. Some admins only allow key authentication.)
[andreas@Andreas-Linux ibm-i-build]$ rsync -av --rsync-path=/QOpenSys/pkgs/bin/rsync --exclude={'.git','build','logs','.vscode','.project','.gitignore'} /home/andreas/projekte/common/ibm-i-build/ prouza@academy:/home/prouza/myproject/; ssh prouza@academy "source .profile; cd /home/prouza/myproject; gmake all | grep crtcmd\|summary | cut -d '|' --output-delimiter ': ' -f 2"; rsync -avz --rsync-path=/QOpenSys/pkgs/bin/rsync --include={'logs/***','build/***'} --exclude='*' prouza@academy:/home/prouza/myproject/ /home/andreas/projekte/common/ibm-i-build
sending incremental file list
sent 737 bytes received 17 bytes 502,67 bytes/sec
total size is 138.482 speedup is 183,66
summary ===============================================================
summary Build RPG: 2 testlog.rpglepgm testlog2.sqlrpglepgm
summary Build CL: 0
summary Build DSPF: 0
summary Build SRVPGM: 2 logger.sqlrpglemod testmod.rpglemod
summary Build DB: 1 logger.sqltableobj
summary ===============================================================
receiving incremental file list
build/
build/logger.sqltableobj
build/logger.sqlrpglemod
build/prouzadir.bnddir
build/prouzadir.bnddirinclude
build/prouzadir.bnddirtarget
build/testlog.rpglepgm
build/testlog2.sqlrpglepgm
build/testmod.rpglemod
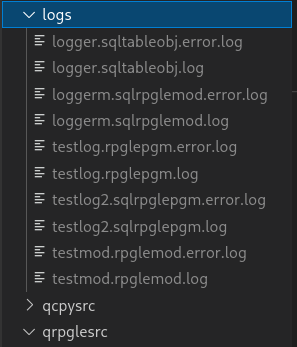
logs/
logs/logger.sqltableobj.error.log
logs/logger.sqltableobj.log
logs/logger.sqlrpglemod.error.log
logs/logger.sqlrpglemod.log
logs/testlog.rpglepgm.error.log
logs/testlog.rpglepgm.log
logs/testlog2.sqlrpglepgm.error.log
logs/testlog2.sqlrpglepgm.log
logs/testmod.rpglemod.error.log
logs/testmod.rpglemod.log
sent 2.636 bytes received 11.154 bytes 9.193,33 bytes/sec
total size is 258.516 speedup is 18,75
[andreas@Andreas-Linux ibm-i-build]$
You should have a logs directory containing the spools of the compiled object and the joblog for each object.
Sync automatically after code changing
Since we also have configured the Run On Save extension, everytime a source get saved, the project folder will be synced with the IBM i.
For example: I changed a line of code in the testlog2.sqlrpgle source.
In the Output view of vscode you can see the output:
Running on save commands...
*** cmd start: rsync -av --rsync-path=/QOpenSys/pkgs/bin/rsync --exclude={'.git','build','logs','.vscode','.project','.gitignore'} /home/andreas/projekte/common/ibm-i-build/ prouza@academy:/home/prouza/myproject/
Run on Save done.
sending incremental file list
qrpglesrc/testlog2.sqlrpgle

sent 1.201 bytes  received 46 bytes  831,33 bytes/sec
total size is 158.956  speedup is 127,47
Using Code for IBM i
In addition I also use the “Work with Actions” possibility in the Code for IBM i extension to build the application with gmake.
In “Command to run” field I use:
/QOpenSys/pkgs/bin/bash -c "error=*EVENTF lib1=&CURLIB cd ~/myproject; gmake all"
The advantage of this is, that I get the compile information directly in my currently opened source.
So if I am trouble shooting with a source change, this is my choise.
As far as I know it even works if my opened source is a local one and not opened from IBM i IFS.
I also use the “Work with Actions” to show a list of changed sources which would be compiled
RDi & RSYNC
Like in vscode you can also define in RDi (Menu: Run –> External Tools –> External Tools Configurations –> create a new “Program” konfiguration).
Detailed information will follow.
VSCode or RDi & GNU Make
Also in both IDEs you can define own build commands where I put the gmake all command in it.
Archives